Lego Wedo
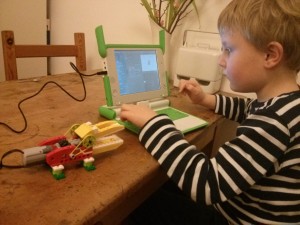
Last week my son, who has just turned 6, tried out the Lego Wedo kit that I’ve had sitting in the cupboard until I thought he was ready. It’s a very simple system of sensors and a motor that plug into a computer via a USB hub so the child can write simple programs to control it. For instance, the program can turn the motor on or off depending on the whether a sensor detects something.

It’s a nice simple first step into programming and robotics for kids that aren’t old enough to deal with Lego Mindstorms, which I guess needs a higher level of reading and writing skills. Controlling real objects in the real world is interesting enough to small children. As robotics is not yet pervasive in everyday life, the limited functionality is helpfully simple without seeming unimpressive.
It’s the best equivalent I’ve found for my own first programming experiences with BASIC on the Sinclair ZX81 when I was 8 years old. That didn’t allow anything but programming from the moment you turned it on, and the BASIC keywords were just a keyboard press away. Putting text on the screen and reading text input was new enough to keep my interest. Today, children expect computers to do much more impressive things on a screen. But they don’t expect so much from Lego.
I talked my son through building the programs, encouraging him to start with simple steps, checking that they worked, finding out why they didn’t work, and then building upon that step, until he had a whole program. For instance, first we would make something move, then make it move as we wanted, and only then think about how to make it move only at certain times or how to make things happen onscreen. Plenty went wrong so he had a chance to learn that errors and debugging are normal.
Lego Wedo is part of the Lego Education line, which is aimed at schools, and their procurement processes, rather than general consumers. This need to support a network of distributors, and to provide curriculum support and lesson plans, is probably why it’s so expensive. The Basic Lego Wedo set (Lego kit 9580) is 129.95 Dollars in the US, or 148.74 EUR in Germany. Until recently, it was hard to buy this stuff as an individual, at least here in Germany, but the Lego Education online shops (listed here) now allow this. And the Lego Wedo kit is available on Amazon.de from third parties. It’s probably worth looking on ebay too.
Scratch instead of the Lego Wedo Software
The kit is useless without software, so you usually need to buy the Lego Wedo software separately, making the whole thing even more expensive (89.95 USD in the US, or 101.14 EUR in Germany, though I think it used to be twice as much). It runs only on Windows and Mac.
Luckily, MIT’s Scratch 1.4 has support for Lego Wedo. It “just works” on Linux, at least on Ubuntu Linux and Fedora Linux. Scratch is available for Windows and Mac, so I guess that it will work there too.
We have an OLPC XO laptop which has Scratch installed by default, which works perfectly with the Lego Wedo. I recommend this setup wholeheartedly because then the child doesn’t need to deal with all the surrounding crap in an adult’s operating system and doesn’t need permission or help to start playing. Unfortunately, I don’t know how individuals can buy these now, though you might have luck on ebay.
I’m not a fan of Scratch’s user interface because it expects kids to drag and drop, or click, on tiny targets and read tiny text. I guess that the official software is much easier. But Scratch is way better than nothing, and my 6-year old child can handle it now.
When the Lego Wedo USB Hub is connected, the Motion and Sensing areas have extra Lego Wedo Scratch blocks for use with the motors and sensors.
Unfortunately, the latest version (2.0) of Scratch, as seen on the main Scratch site, is browser-based, using Flash, though they are apparently aiming to rewrite Scratch in Javascript. It doesn’t seem likely that the online version will support hardware such as Lego Wedo any time soon, though it’s apparently in progress. Luckily the older versions are still available and still work.
Lego Wedo Hardware
The Lego Wedo basic kit has one motor, a distance sensor and a tilt sensor, along with the lego pieces, such as blocks, cogs, and axles, needed to build the models seen below. That’s obviously fairly limiting, but it’s enough for some first steps for young children.
The official Lego software can apparently control multiple motors, and multiple USB hubs, but MIT’s Scratch can only control one motor without installing a custom thingy.
The Lego Wedo motor is the same as the Power Function motors that can be bought separately or that come with big Lego kits such as the Lego Technic 4×4 Crawler which my son has just built. However, these motors and sensors are not compatible with the Lego Mindstorms system (neither the older NXT nor the newer EV3 systems), which is rather annoying.
Lego Wedo Models
We built a few of the basic Lego Wedo models using the online PDF instructions. The advanced models, such as the ferris wheel, need (unusual) parts from the LEGO Education WeDo Resource Set (Or “Expansion Set” – Lego kit 9585) but we might try building something similar with what we have.
We had to think up suitable Scratch programs for ourselves, but that’s a useful exercise. The Lego Wedo Teachers guide (see Activities here) has some helpful suggestions about what you might try to achieve.
We built these models:
(View this at the original page if you can’t see the (done in a rush) embedded videos.)
Hungry Alligator
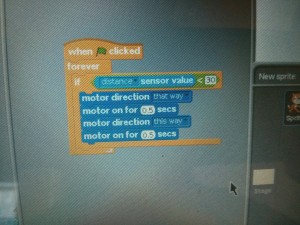
The alligator snaps its jaws open and shut when your finger gets close enough. Our program kept checking the distance sensor, and when that had a small enough value, we turned the motor on in one direction for some time and then in the other direction for some time. We had to make sure that the mouth was open when it finished, or it would block its own sensor and keep snapping forever.
Here’s a picture of our program:

Goal Keeper
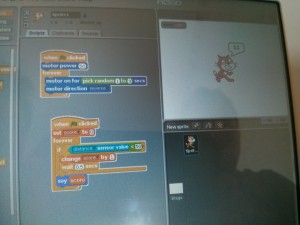
The goal keeper moves around in front of the goal. The distance sensor behind the goal detects balls moving past it, so the program can keep score. We had two sets of blocks – one to move the goal keeper at random, and one to keep checking the sensor, incrementing a variable and showing its value on screen. We hacked in a wait to stop it from incrementing the variable too much as the ball passed the sensor but this could be cleverer.
Here’s a picture of our program:

Flying Bird
The bird’s body and wings can be moved manually. There’s no motor in this model. It’s just a fancy way to trigger the distance and tilt sensors. When the body moves, the tilt sensor triggers a flapping sound from the computer, and when the head blocks the distance sensor, the computer makes a chirping sound. Scratch has a bird chirp sound by default but we had to record ourselves saying “flap” for the other sound.
The tilt sensor is rather imprecise, and only provides one value at a time to indicate one of flat, up, down, left or right, which doesn’t make much sense. Scratch displays the value as a number between 0 and 4 which makes things hard for kids. The meaning of each tilt value is mentioned here.
Drumming Monkey
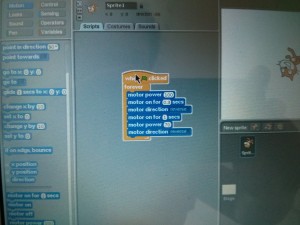
The monkey’s arms move up and down due to the motion of the rotating cams attached to the motor, letting you change the rhythm by changing the motors speed and duration, and by changing the positions of the cams and the arms. This model has no sensors. It’s rather underwhelming.
Here’s a picture of our program:


